HippoCeption
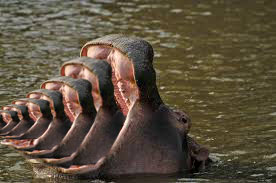
Open image of hippo.
Open the pen tool and add anchor points outlining the hippo. Right click then select “make a selection”
Press Ctrl+J to copy the selection onto a new layer.
Double click on the background layer so that you can edit it.
Press Ctrl+T and adjust the corners of the image and make it smaller and move it so that it rests inside the hippo’s mouth. Then press the check mark at the top of the screen.
Then, using the eraser tool, erase the parts where the two heads overlap so that it look like the smaller mouth is coming out of the larger mouth.
Merge the two layers: Select both in the layer menu and the press Ctrl+E
Once again use the pen tool and outline everything and use Ctrl+J to create another layer and repeat the previous process of erasing the overlapping.
Repeat steps until you can no longer add hippos to the image.
What Could Have Been
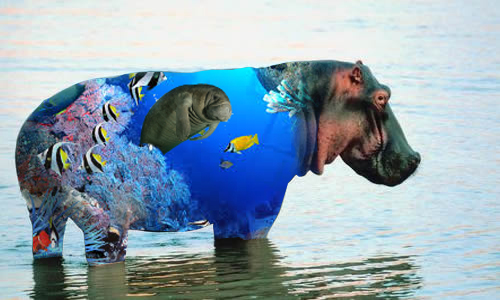
1.
Get a picture of (1) a sad looking hippo, (2) a
manatee with minimal obstructions, (3) a scene with colorful fish. Open all
three photos in photoshop.
2. Remove any back ground from the manatee picture
3. Select the manatee and copy it into the tab with the “fish scene”
4. Transform the manatee layer however you best see fit. In my piece I transformed it so that it was smaller and in the middle.
5. Use the eraser tool at 100% opacity to erase any over lap between the fish scene and the manatee. In my piece I erased most of the tail of the manatee to allow the viewer to see the coral reef behind it.
6. Merge both of these layers by going layer> merge visible
7. Select and copy this image into the tab with the hippo in it.
8. Click on the layer with the hippo in it and select your pen tool.
9. Outline the back of the hippo all the way to its neck.
10. Right click and make the patha selection.
11. Ctrl+J
12. Place the fish scene layer on top of all the layers.
13. Create a clipping mask: layer> create clipping mask.
14. Use the eraser at15% opacity(you can use higher or lower opacities as desired) to even out the transition from the picture to the neck. You can also use this technique some for where you know there are shadows on the original image.
HI-POP ART-oumous
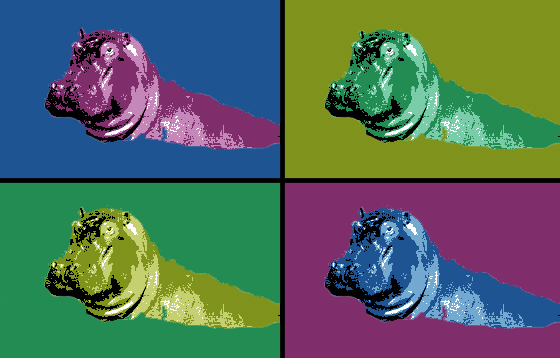
1.
Get a picture of a hippo. Open it in photoshop.
2. Measure the size of the photo using the select tool and open three new projects with the same dimensions.
3. Return to your original piece.
4. Use the magic eraser tool to erase any background. If you run into issues where you accidentially cut away at some of the hippo, use the regular eraser to outline the hippo where you are having issues, then continue on with the magic eraser tool.
5. Once you have eliminated the background. Go to image>adjustments>desaturate(or press Shift+CTRL+U)
6. Posterize the picture. (image>adjustments>posterize) For my photo, I chose four posterized layers. You may do more or less.
7. Select>color range>selet: sample colors> use the eye dropper to select the second darkest color.
8. Add a color balance to the hippo.
9. Copy the hippo layer and paste it onto each of the other projects. Hide the background layer in each of the other projects.
10. For each of the other projects, also place a color balance on the hippo, but use different colors. Focus on contrasting each of the hippos.
11. Merge all visible layers in each of the projects.
12. Open a new project that is twice the size of the original picture of the hippo.
13. Copy each of the hippos and align them into the quadrants of the piece.
14. Draw a line from the top of the project to the bottom. This line should be four units wide and angled at -90 degrees.
15. Copy this Line (Ctrl+J) and transform it(Ctrl+T) so that it cuts across the middle of the project, horizontally at 90 degrees.
16. Use the foreground color picker to select the darker color of the image in the top right corner, and use the paint bucket tool to put this color in the background of the image in the bottom left.
17. Switch the above process( put the darkest color from the bottom left into the top right background) and then repeate it for the opposite set of hippos.
18. J
Hippie-o
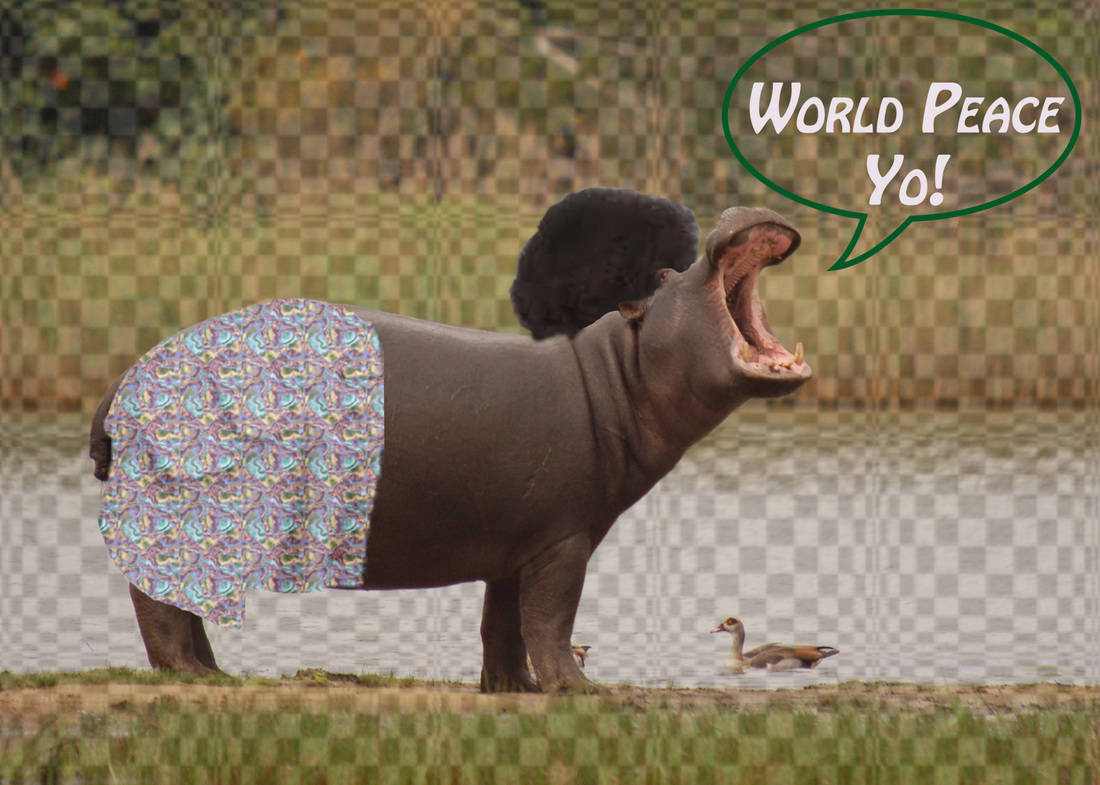
1.
Select a photo of a hippo with a side view and
an open mouth. Also get a picture of pants on a dog. Open both the photos in Photoshop.
2. Use the pen tool to outline the pants on the dog. Right click and make selection.
3. Press Ctrl+ C and then click on the tab with the hippo on it and paste the image onto the image of the hippo. Don’t worry about the size of the image.
4. Transform the image and adjust it to where the waist band runs the height of the waist of the hippo.
5. Use the eraser tool to slowly remove the bottom of the pants so that the waist band extends all the way, and the pant leg goes about half way down the leg. Make sure that you erase some sort of angle in between the two so that it is not just a straight line. (also it is ok if you can see some tail)
6. Select the image of the pants and go to layer> layer styles> pattern overlay. Choose any psychedelic pattern you like and set the opacity low so that you can see some of the shadows of the original pants.
7. Get a picture of and afro. Find something that will be easy to cut out. (I used an afro pigtail BC I could use just the pigtail J open in Photoshop.
8. Using the pen tool, outline and make a selection of the afro, then as you did above, copy it into the photo of the hippo.
9. Transform the afro so that it rests on the head of the hippo. It’s ok if it covers some eyes and stuff. Just erase the afro using the erase tool to where it lies on top of the hippo head. Erase just barely beyond the edge of the eyes, ears, and back of head.
10. Use the clone tool to fill in the space you left beyond the eyes, ears, and back of head.
11. Using the custom shape tool, create a comment bubble with no color fill and a dark green stroke of pt.3. Click on the text tool and in the space (a circle around the text creation icon will appear) within the text bubble write some form of activism. (I wrote “World Peace Yo!”)
12. Merge the text and the shape layer and then hide that layer.
13. Merge all the other layers then make a selection of the hippo, and using Ctrl+ J create e new layer with the selection.
14. Select the layer with the complete image and layer>layer style>pattern overlay. Choose the checkerboard pattern and set it to 650 scale and an 11 opacity.
15. Unhide the activism and you’re all good to go! J
Princess
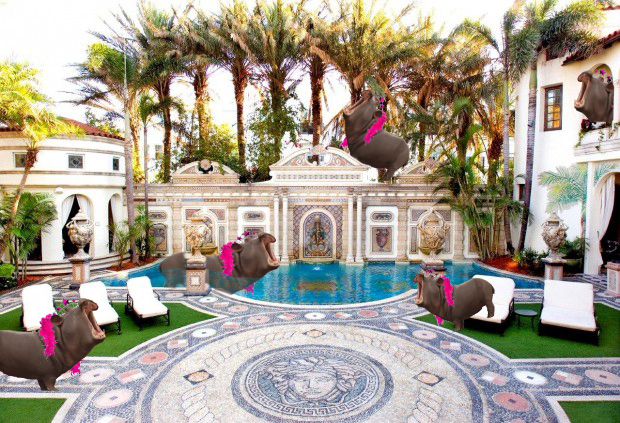
1.
Find an image of a hippo. Open it in Photoshop.
2. Distort the hippo. Use the liquefy tool. Filter>Liquefy.
3. Distort the hippo however you like, but try to focus on the bloat tool. IN my photo I used the bloat tool to expand the head, mouth and buttocks of the hippo.
4. Save this as an image (jpeg).
5. Open the new jpeg and the original photo. Use the pen tool to cut out the distorted hippo, then make a selection, copy it onto the original photo then use the transform tool to adjust it so that it lines itself up over the original hippo.
6. Find an image of a pink feather boa and an image of a tiara. Open both of them in Photoshop.
7. In both photos, use the magic eraser tool to remove any background. Then copy the boa into the hippo image. Place it so that one side of the boa rests over the neck of the hippo, then erase the right side of the boa so that it looks like the boa is around the hippos neck.
8. Copy another photo of the boa into the image of the hippo and then place it so that the end of the right side of the boa hangs just beyond the neck of the hippo. Erase the rest of the boa.
9. Copy the tiara into the image of the hippo. Use the transform tool to adjust it so that it rests on the hippo’s head. Use the eraser tool to erase away any parts of the tiara that cover the hippo (aka. Eyes, ears etc.)
10. Save that image as a jpeg and reopen the jpeg.
11. Find a picture of a rich –looking or fancy house and copy the jpeg of the princess hippo into the picture of the fancy house. Then press CTRL+ J four times to create five different copies of the hippo.
12. Hide the tope images of the hippo that you are not working with and select the layer with the hippo that you are working with.
13. Use the transform tool to adjust the size and positioning of the hippo.
14. Use the erase tool to erase anywhere where the hippo would be behind something: i.e. a column, plant, and window. Etc. (Tip: in my rich house photo, there was a pool. I placed one of the hippos in the pool and to make it look like part of its body was underwater, I set the eraser opacity to 34%)
15. Repeat steps 13 and 14 for all of the hippos.
16. Save J
We Will Always FIght
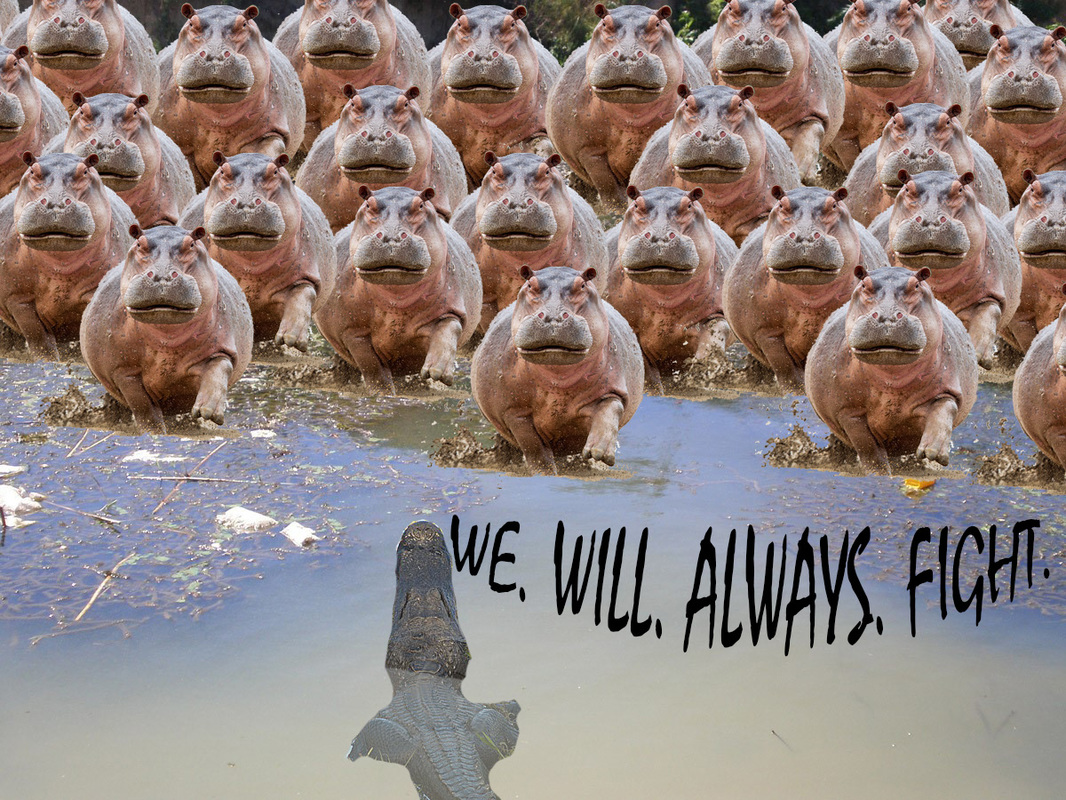
- Find a picture of a charging hippo, a posterior
view picture of a crocodile, and a background image of dirty water. Open all in
Photoshop.
- Use the magic eraser tool to cut out the
background of the charging hippo photo. Then open a new project that is larger
than the background image. Copy the picture of the hippo into it, and Pres
CTRL+ J several times.
- GO through each of the copy layers and transform
it so that all the hippos are in a line type of formation (I made mine come out
in a triangle a bit) TIP: Move the layers around some to put some hippos behind
others and in front of others.
- Hide the background layer then press
Shift+Ctrl+E to merge all the hippo layers together.
- Select, your new hippo army layer, the press
CTRL+J. Then, unhide the background layer, then select the copied hippo army
layer and press Ctrl+ T.
- Using this shortcut you can transform the copy
of the hippo army layer to be behind the original hippo army layer. As you are
doing this, the copy layer will actually be above the original, but just move
it closer to the top of the screen, and then afterwards, hit the check mark,
and move the copy layer below the original layer.
- Merge the two together, and if you need more
hippo armies repeat the above steps until you fill up the top two thirds of the
background.
- Next, remove the background of the crocodile and
copy it into the layer with the newly formed hippo army. Transform the croc so
that it is towards the bottom of the screen, facing the hippos.
- In my background image, the crocodile was in the
water, so to make it look like part of him was in the water, I made a selection
of the body part that I wanted in that water, copied it into a new
layer(Ctrl+J), then I placed a filter over it. The filter was in the filter
gallery and it was called the ocean ripple filter.
- I
then erase the same body part on the complete copy of the crocodile at a low
opacity. (45%)
- Add
text using the Text tool.
- Type:
WE. WILL. ALWAYS. FIGHT. size 60, font: minstrel regular. Then arc the text by
clicking on the icon with the arc and a t over it, at the top of the screen.
Arc the bottom half (second option).
- Then,
transform the piece so that it fits into the background to the right side of
the croc. J
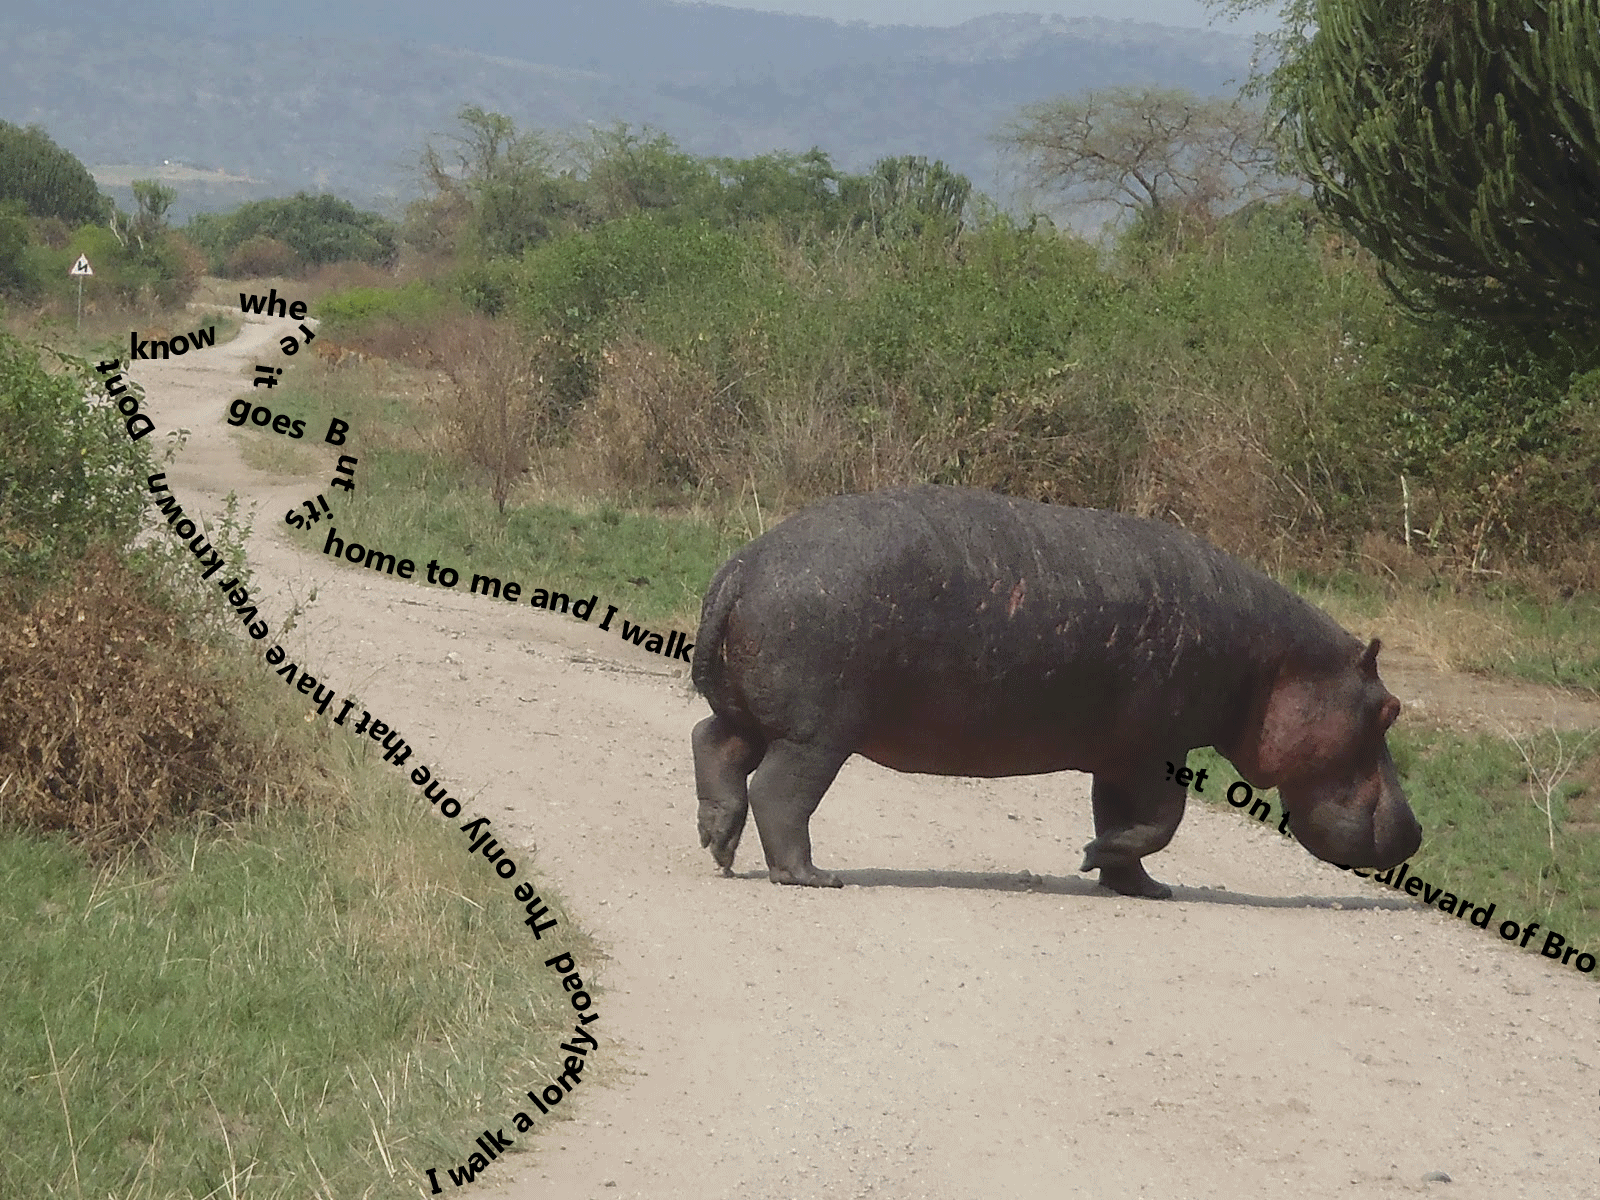
ALL BY MYSELF
- Find a picture of a hippo on a winding road.
Open it in Photoshop.
- Using the pen tool, outline the edges of the
road and if the hippo, intersects these edge of the road, just continue through
the hippo, estimating where the road would be.
- Close the anchor points and make a selection. Go
to the paths tab and at the bottom select, the icon of a ring with four dots
around it.
- Click on the txt tool icon, and move your cursor
onto the work path until it turns into a t with a curved line through it. Then
Click.
- Type the words to a song about loneliness (I
used boulevard of broken dreams) along the work path. I used a font size of 36
and the font Microsoft New Tai Lue. Then click at certain points along the work
path where the letters or words are mixed up and add spacing so that it flows.
- Copy the layer using Ctrl+J. Then at the
beginning of the lyrics add a bunch of spaces, and readjust the spacing
throughout the writing so that it flows. Then copy this layer.
- Repeat this process until the text leaves the screen
entirely. TIP: as you are copying the layers, copy the layer, hide the
previous, and then begin your work.
- Unhide all the layers and click on the eraser
tool.
- Select the first layer and erase where the text
is on the hippo and anywhere else where it’s not outlining the road. If you
don’t see any immediate results don’t worry, you have to repeat this process
for each of the layers so that you can see the hippo.
- Window>Add
timeline>Crete timeline. > Three squares at the bottom left of the
screen.
- Photoshop
automatically selects and visible layer as the first frame.
- Duplicate
that frame by clicking the page looking icon then make the layer you want that
frame to be, visible.
- Create
a new project.
- Layer>
Layer styles>gradient overlay (blue and white). (Make sure to double click
the background layer to unlock it).Copy that layer.
- Go
to the 3D tab and click mesh from preset and create a cone, then on the other
layer do the same and create a sphere. Line the sphere up with the cone and
then go to the layers tab and merge the two layers. It should look kind of like
a tear. Copy this into your gif and add it to the top most layer. Add a lenses
flare to the tear for extra effect.
- Save
for Web. All done!
Adopt a HIPPO

- Find a picture of a baby hippo and open it as
well as an 8.5X11 project in Photoshop.
- Remove the background of the hippo, and copy it
into the project. Transform it so that it is centered and fills up the middle
of the screen proportionally.
- Apply the cutout filter to the hippo. Filter>
Filter gallery> artistic effects> cutout
- Fill in the background of the project with an
olive green color.
- Create a “custom shape b right clicking the
create a rectangle tool (bottom left of the screen: rectangular icon) and
selectin the “custom shape tool”. Create the argyle patter and spread it across
the entire page.
- Fill this argyle pattern with one of the darkest
colors in your hippo or a color that is not as prominent.
- Using the pen tool, outline just the back of the
hippo. Open your paths tab and create a work path by clicking on the ring with
four dots.
- Open the text tool and click on the path when
the icon becomes a “T” with a wavy line through it.
- Type the words: “Now is your chance” and make
them a salmony color, size 48 font, and impact regular font.
- Then
create a regular text box and type the words “adopt today” in all CAPS in Gill
sans ultra-bold, size 60, and also a salmony color. Place this text box
underneath, and touching the hippo.
- Then
create a text box and write the contact information for your hippo adoption agency
in it. Use black gill sans ultra-bold, size 25, centered. And then transform it
so that it is centered. Stroke this text with black.
- Ta-da!
Reach for the Stars
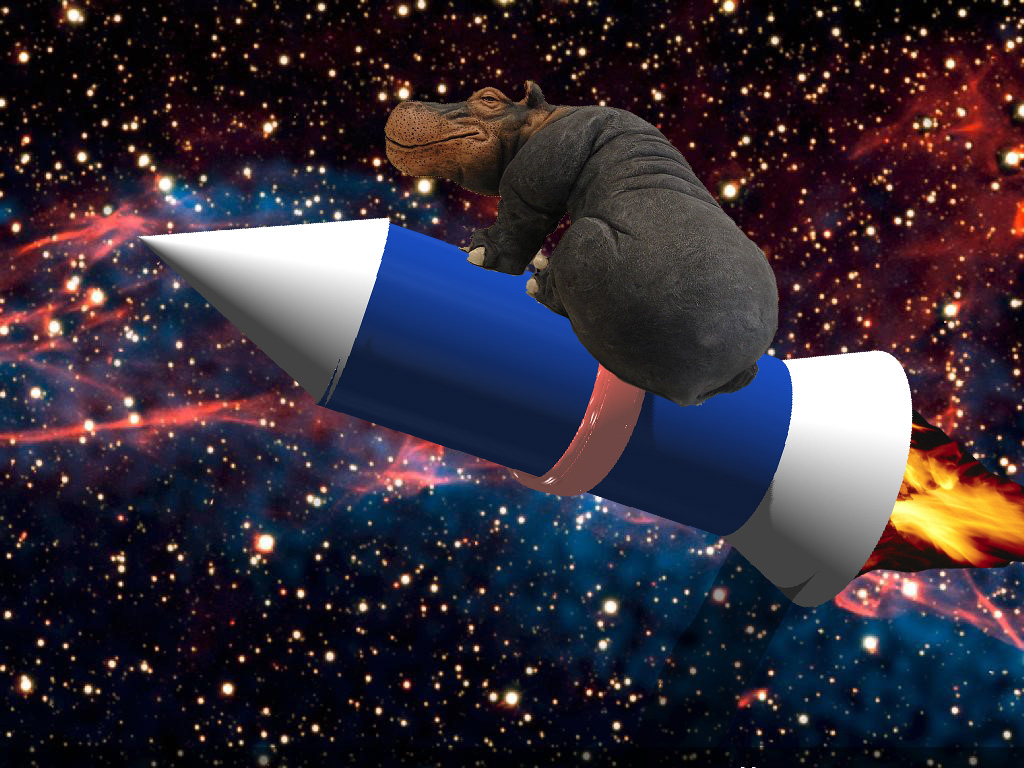
- Open a photo of a sitting hippo, a space or
galaxy background, a fire(concentrated in one place, not just like “fire”), and
a new project in photoshop.
- In the new project, double click the background
layer to unlock it and fill in the back ground dark blue.
- Click on 3D> New mesh from preset>
cylinder.
- GO back to the layer tab on the right side of
the screen, and add another layer, fill it with a white background, and using
the same technique create a cone.
- Then repeat step four.
- Once again, repeat step four, but fill the layer
red, and create a ring.
- Merge the layers together one at a time after
oyu readjust them to fit. So for example, merge the first cone and the cylinder
layer together then adjust the first cone so that it rests on top of the cylinder.
Then merge in the other cylinder and adjust it so that it is just peeking out
the bottom of the cylinder.
- Then merge in the ring and adjust it so that it
surround the cylinder at the midway point.
- TIP: when readjust the objects, rotate, move,
and resize using the Cartesian plane provided when you click the object.
- Using
the camera position tool, rotate it so that you can get a full image of your
new rocket ship.
- Copy
this image into the space/ galaxy picture. Using the transform tool, rotate the
ship and move it so that it is in the center of the image.
- Using
the magic eraser tool, remove the background from the hippo picture. Copy the
hippo into the galaxy background. Using the transform tool, move it so that it
looks as if the hippo is resting on the spaceship.
- Cutout
the fire from the image using the pen tool, and copy it into the galaxy
picture. Make sure that this layer is below the layer of the rocket ship.
Transform this fire so that it looks as if it’s coming out of the rocket ship.
Everybody's a Winner?
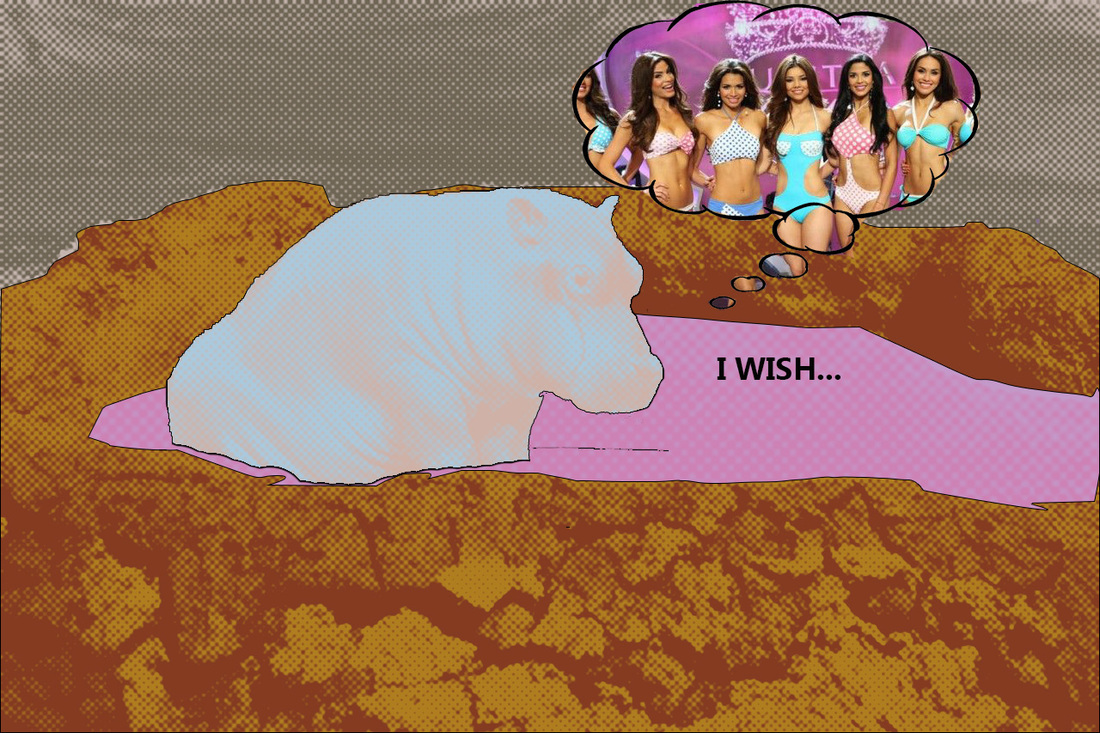
- Open a picture of a pageant lineup, a sad hippo,
a mud pool, and a thought bubble, in Photoshop.
- Outline any obvious edges in your mud pool using
the pen tool. Copy them into new layers.
- Create a half tone pattern for each of the
layers. The half tone pattern uses the two colors you have on the left hand
side of the screen, to create an old-timey comic book effect. TO create e half
tone pattern go to filter> filter gallery>sketch> halftone pattern.
- Add a thing black stroke to each layer.
- Remove any background from the hippo, and then
copy it into the mud pool project. Create a half tone pattern using two colors
that are different from the surrounding mud bath( I suggest using the eye dropper
tool to choose the two main colors for the halftone pattern)
- Stroke the hippo, and place him/her in the mud
bath, if there is any overlap with the hippo in the mad bath erase his feet
using the eraser tool so that it looks like he is in the mud bath.
- Remove any background from the thought bubble
and copy it into the mud bath project. Place it near the hippo’s head.
- Copy the pageant lineup onto the mud bath
project, and place its layer behind that of the thought bubble and erase around
the thought bubble on the pageant lineup layer.
- Create a text box and write “I wish…” in
Microsoft New Tai Lue, size 36 towards the bottom right of the image.
- Voila!
Isn’t that hippo sad? LL
